Table of Contents
A safari in Tanzania offers countless opportunities for photographers of all skill levels to capture breathtaking images of wildlife, vast grasslands, and vibrant sunsets. Whether you are brand new to photography or an experienced shooter looking to fine-tune your skills, understanding the fundamentals of safari photography will help you return home with images that truly reflect the majesty and wonder of Tanzania. In this article, we will explore essential tips for photographing wildlife and landscapes, gear recommendations, compositional techniques, ethical guidelines, and more. By the end, you will have a roadmap for transforming your safari experience into a portfolio of striking images.
1. Understanding the Appeal of Safari Photography
1.1 The Magic of Wildlife Encounters
One of the greatest thrills of a safari is seeing wild animals in their natural environment. A photograph can freeze a moment in time—a lion roaring at dawn, a herd of elephants crossing the savannah, or a leopard perched on a tree branch. These encounters elicit excitement, respect, and sometimes even a bit of fear. By learning basic photography techniques, you can capture these scenes in a way that tells a story and preserves the memory for years to come.
1.2 The Beauty of Natural Landscapes
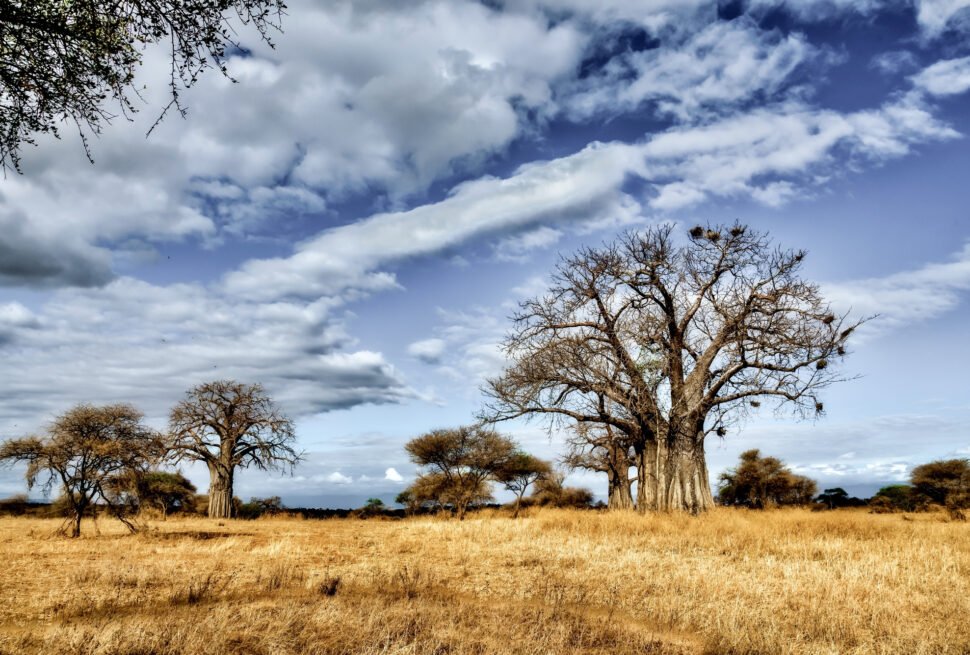
Tanzania’s landscapes are as diverse as its wildlife. You can find dramatic volcanic craters, sweeping grasslands, towering baobab trees, and lush riverine forests. Each of these backdrops offers its own unique challenges and opportunities for photography. Mastering how to capture a sense of scale and depth will help your landscape shots evoke the same wonder you felt when you first laid eyes on these places.
1.3 More Than Just Taking Pictures
Safari photography is not just about equipment or camera settings. It is also about patience, timing, and respect for wildlife. When you are on a game drive, you must be prepared for sudden changes—an animal might walk into frame when you least expect it, or a cloud might shift the light dramatically. Understanding animal behavior can also help you anticipate movements and set up for the perfect shot. This blend of technical skill, curiosity about wildlife, and respect for nature is what makes safari photography such a rewarding pursuit.
2. Preparing for a Tanzanian Safari with Photography in Mind
2.1 Researching the Parks
Tanzania is home to multiple national parks and game reserves, each with distinct landscapes, wildlife concentrations, and seasonal variations. Knowing where you are going helps you plan for what types of images you want to capture. For instance:
- Serengeti National Park: Famous for wide-open plains, predator-prey interactions, and the annual Great Migration.
- Ngorongoro Crater: A natural enclosure teeming with wildlife, offering excellent chances to spot the Big Five (lion, leopard, elephant, rhino, buffalo).
- Tarangire National Park: Known for large elephant herds, iconic baobab trees, and diverse birdlife.
- Lake Manyara National Park: Compact, scenic park with tree-climbing lions and thousands of flamingos.
- Ruaha National Park: Remote and less crowded, offering raw, unspoiled wilderness scenes.
By understanding the specific character of your safari destinations, you can better prepare for the types of shots you want.
2.2 Timing Your Trip
Wildlife photography often depends on seasons and weather. In Tanzania, the dry season (June to October) generally offers the best opportunities to see large numbers of animals because vegetation is sparse, and wildlife tends to gather around water sources. The wet (or “green”) season (November to March) can offer lush backgrounds, dramatic skies, and fewer tourists, but wildlife may be more dispersed. Think about the types of images you prefer: dusty sunsets, lush greenery, dramatic rain clouds, or river crossings during the Great Migration. Each season tells a different photographic story.
2.3 Health and Safety Preparations
Photography in the bush can be physically demanding, particularly if you are lugging around heavy camera gear. Make sure you are updated on travel vaccinations recommended for Tanzania, and consider malaria prophylaxis if advised by your doctor. Bring sunscreen, a hat, and insect repellent. For peace of mind, it can be wise to have travel insurance that covers both medical treatment and expensive camera equipment. Lastly, stay hydrated and follow all safety briefings from your driver-guide.
3. Essential Photography Gear
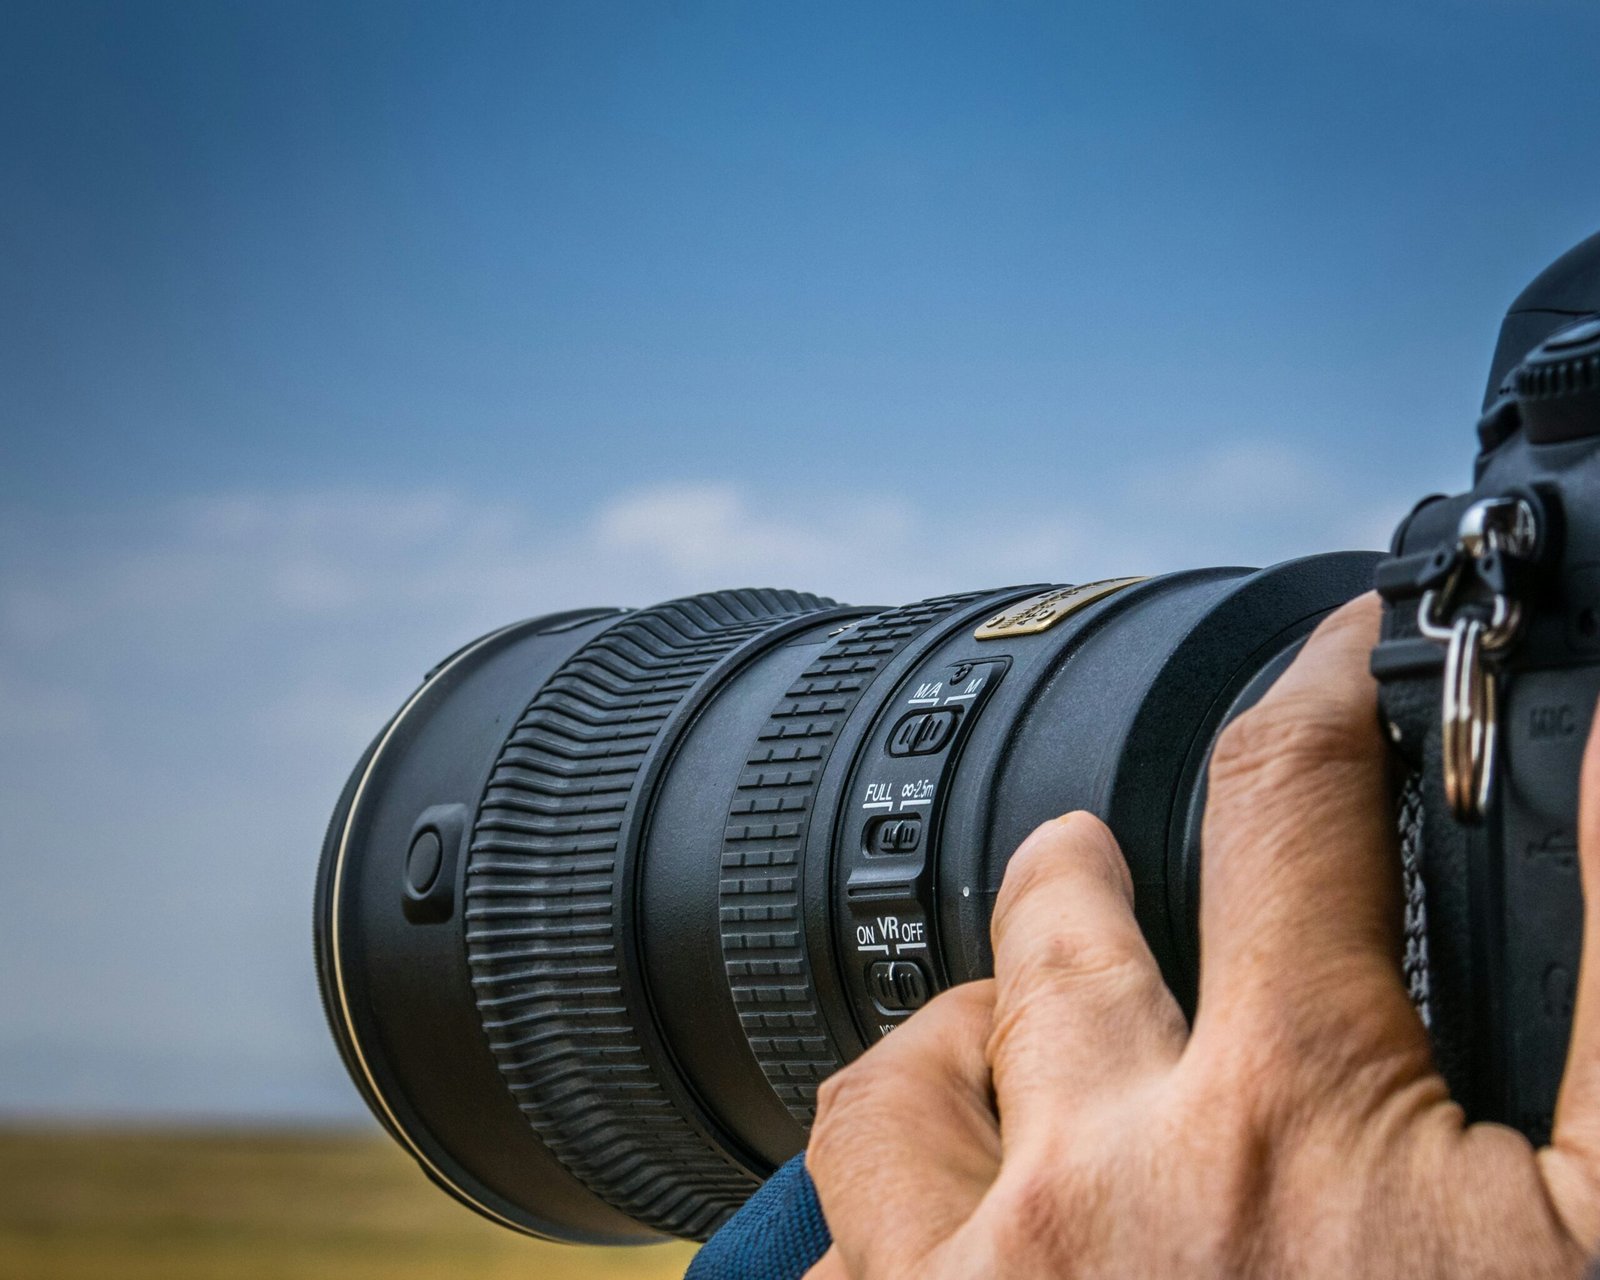
3.1 Choosing the Right Camera Body
Modern digital cameras come in a variety of forms—DSLR, mirrorless, advanced compact, and even smartphones. For best results, consider a DSLR or mirrorless camera with fast autofocus and the ability to shoot in RAW format. These cameras generally offer better low-light performance and more flexibility in lens selection. Still, an advanced compact camera can also produce wonderful images, especially if it has a powerful zoom lens.
3.2 Lenses for Wildlife and Landscapes
- Telephoto Lenses (100–400mm or 150–600mm): These are indispensable for wildlife photography. A longer focal length helps you fill the frame with the subject without disturbing or stressing the animals.
- Wide-Angle Lenses (10–35mm or 16–35mm): Perfect for capturing sweeping landscapes or giving an “animal in its environment” look, where you show wildlife against a grand backdrop.
- Mid-Range Zoom (24–70mm or 24–105mm): A versatile walk-around lens that can be useful for photographing people, details, or moderate-range wildlife scenes.
3.3 Other Useful Equipment
- Sturdy Camera Bag or Backpack: Your bag should protect your gear from dust and bumps, and it should be easy to handle in a safari vehicle.
- Bean Bag or Window Mount: Since many shots are taken from inside a safari vehicle, a bean bag or specialized window mount helps stabilize your camera on the windowsill.
- Extra Batteries and Memory Cards: Power outlets can be limited in some remote lodges, and memory cards can fill up quickly.
- Lens Cleaning Kit: The dusty environment means you will need to clean your lens frequently.
3.4 Backup and Storage Solutions
Dust, heat, and unpredictable events in the bush can pose a risk to your gear and data. Bringing a portable external hard drive or a laptop allows you to back up your photos at the end of each day. Some photographers use memory cards with built-in wireless capability or portable backup devices that can transfer images directly from cards. Having multiple backups ensures that you won’t lose the images of a lifetime due to a simple glitch.
4. Camera Settings and Techniques for Wildlife
4.1 Mastering Shutter Speed
Wildlife photography often involves capturing animals in motion. Whether it is a cheetah sprinting across the savannah or a bird taking flight, you usually need a fast shutter speed to freeze the action. As a general guideline:
- 1/1000s or faster for fast-moving subjects.
- 1/500s can suffice for slower movements or large mammals walking.
- 1/250s might work if your subject is still, but you risk introducing blur if there is any movement from the camera or animal.
Using shutter priority mode (Tv on Canon, S on Nikon/Sony) can be helpful. You set a fast shutter speed, and the camera will adjust aperture and ISO accordingly. Alternatively, using manual mode with auto ISO can also give you fine control over shutter speed and aperture while letting the camera handle ISO adjustments.
4.2 Aperture and Depth of Field
When photographing a single animal in the frame, a wider aperture (f/4, f/5.6) helps blur the background, isolating the subject. If you want more of the scene in focus—say a herd of elephants at different distances—consider using a smaller aperture like f/8 or f/11. However, remember that smaller apertures will require more light or a higher ISO, especially in low-light conditions like early morning or late afternoon.
4.3 Burst Mode and Autofocus
Wildlife behavior can change in a split second. Using continuous or burst shooting mode gives you a series of images to choose from, which can be critical when photographing action like a lion pouncing or a wildebeest leaping over a river. For autofocus:
- Continuous AF (AI Servo on Canon, AF-C on Nikon/Sony): Helps track moving subjects and keeps them in focus as they change position.
- Back Button Focus (Optional): Assigning focus to a button on the back of your camera (instead of half-pressing the shutter) lets you lock focus on a subject and reframe without the camera refocusing every time you press the shutter.
4.4 ISO Management
Safaris often happen during the “golden hours” when light is soft and warm—around sunrise and sunset. These times offer beautiful lighting but also mean less overall brightness. Modern cameras handle higher ISO values better than older models, so do not be afraid to raise your ISO to 800, 1600, or even 3200 if it means you can use a fast shutter speed. A slightly noisy image is usually preferable to a blurry one.
5. Composition for Engaging Wildlife Shots
5.1 Rule of Thirds and Eye-Level Perspectives
Even in wildlife photography, the classic “rule of thirds” often works well. Place the animal’s eye or face near an intersection point to create a sense of balance in your image. Getting down to the animal’s eye level (or as close as you safely can) creates more engaging photos by drawing viewers into the subject’s world.
5.2 Space for Movement
If the animal is moving or looking in a particular direction, leave some empty space in that direction. This technique is called “leading space” or “nose room,” and it creates a sense of motion or anticipation in your image.
5.3 Background and Foreground Elements
A busy background can distract from your subject. If possible, reposition your camera or wait for the animal to move to a cleaner background. Sometimes you can use vegetation or terrain features in the foreground to add depth, framing the subject in a natural way. This approach can convey a sense of being hidden, as if you are peering into the animal’s habitat.
5.4 Including Context
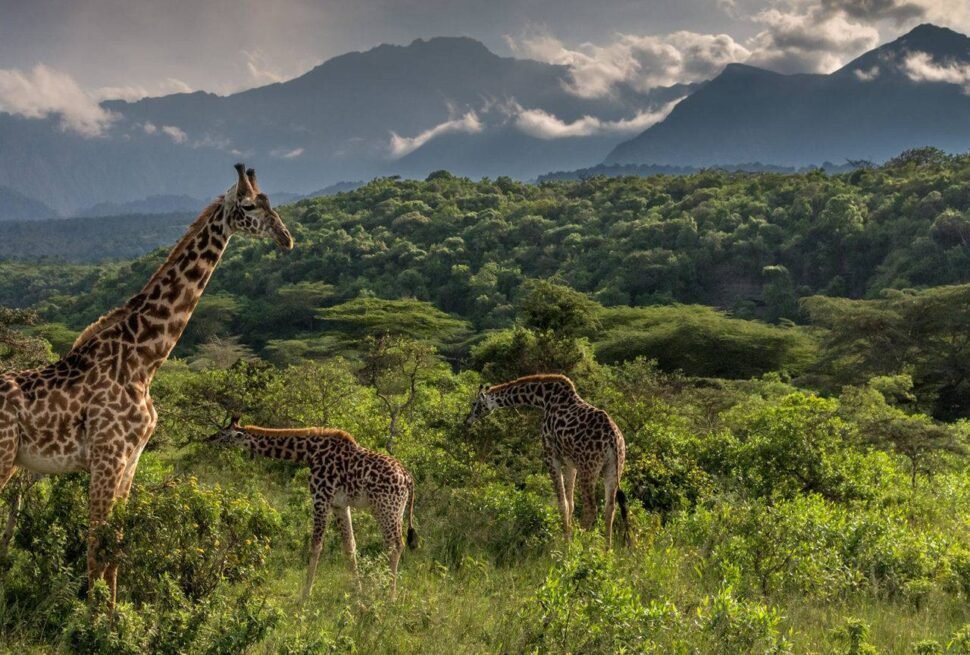
While tight portraits of wildlife can be stunning, sometimes you may want to pull back and show the landscape around the subject. This approach not only documents the animal but also provides context—showing the environment it inhabits. For instance, a giraffe standing beside a baobab tree adds a sense of scale and a hint of the region’s characteristic scenery.
6. Tips for Capturing Stunning Landscapes
6.1 Plan Around Light
The best landscape photos often occur during the golden hour—shortly after sunrise or just before sunset—when the light is warm and soft. Tanzania’s sunsets can be particularly dramatic, often turning the sky vibrant hues of orange, pink, and purple.
6.2 Use a Tripod (If Possible)
In many safari scenarios, you will be in a vehicle where tripods are impractical. However, if you have the chance to do some photography on foot or around camp, a lightweight tripod can be helpful for dawn or dusk shots with slower shutter speeds. It also allows you to compose your shot precisely. If you cannot use a tripod, a bean bag or stable surface can minimize camera shake.
6.3 Experiment with Different Perspectives
While many safari photographs are taken from inside a vehicle, try to find opportunities for unique angles. If there is a viewpoint overlooking a crater (like Ngorongoro) or a raised deck at your lodge, use it to capture wide vistas. Don’t be afraid to experiment with vertical panoramas, focus on interesting cloud formations, or feature prominent trees in the foreground to add scale.
6.4 Creating Depth in the Image
To avoid flat-looking landscape photos, include foreground elements such as rocks, trees, or animal footprints that guide the viewer’s eye deeper into the scene. Leading lines—like a winding river or a pathway—draw the eye toward the background and add a three-dimensional feel to your images.
6.5 Capturing Weather and Atmosphere
Tanzanian landscapes can transform dramatically under different weather conditions—rainy season storms, misty mornings, or swirling dust devils in the dry season. Embrace the weather. For instance, photographing a distant thunderstorm across the savannah can produce striking, moody images. Just be prepared to protect your camera from water and dust.
7. Photographing People and Culture
7.1 Respectful Approach
Tanzania’s cultural diversity is a significant part of its appeal. If you have the opportunity to visit local communities—such as Maasai villages—be mindful and respectful when taking photographs. Always ask for permission before photographing people, especially close-ups, and respect their wishes if they decline.
7.2 Candid vs. Posed Shots
Candid shots can often convey authentic moments and emotions—children playing, a family tending to their livestock, a craftsman at work. Posed shots, on the other hand, allow you to direct the composition. Both styles are valid, but ensure you have the person’s consent and that you handle any fees or donations according to local customs. Some communities rely on photography fees to support community projects, so it’s essential to clarify the arrangement.
7.3 Storytelling with Portraits
When photographing people, try to showcase their environment or daily life. A portrait of a Maasai elder might include a glimpse of the village huts, cattle in the background, or a wide shot that reveals the sweeping plains beyond. This context tells a story about the person’s life and surroundings, making the portrait more meaningful.
8. Ethical and Responsible Photography
8.1 Keeping a Respectful Distance
While it might be tempting to get as close as possible to wildlife for that frame-filling shot, always prioritize the well-being of the animals. Many parks have strict rules about how close vehicles can get to animals, and guides should enforce these guidelines. For personal safety and for animal welfare, respect these boundaries.
8.2 Avoid Baiting or Disturbing Animals
Feeding wildlife or playing sounds to attract animals is unethical and can be harmful. It disrupts natural behaviors and can make animals dependent on humans or aggressive toward them. Always photograph animals as you find them in the wild, without using any means of manipulation.
8.3 Cultural Sensitivity
In some communities, taking photographs of certain ceremonies or sacred sites might be discouraged or forbidden. Your guide or local hosts can advise on what is appropriate. Always respect cultural boundaries and privacy.
8.4 Conservation Impact
Many national parks rely on tourism fees to fund conservation projects. By visiting these parks, you are already contributing, but you can go further. Some photographers donate images to non-profit organizations or share conservation messages on social media. Responsible photography also means using your platform to raise awareness about threats to wildlife and their habitats.
9. Post-Processing and Image Management
9.1 Organizing Files
After each day’s shoot, download your images to a laptop or portable drive. Label folders with dates and locations to easily reference them later. A good file organization system can save you time and frustration when you return home with thousands of images.
9.2 Basic Editing Techniques
You do not have to be an expert in Photoshop or Lightroom to enhance your safari images. Some basic adjustments include:
- Cropping and Straightening: Fix horizon lines and improve composition.
- Exposure and Contrast: Correct underexposed or overexposed areas to bring out details.
- White Balance: Adjust the color temperature to match the scene, especially for golden hour shots.
- Color Saturation: Be careful not to oversaturate, as this can result in an unnatural look.
9.3 Selecting the Best Shots
It is easy to end up with hundreds of images of the same subject. As you review your photos, apply a consistent system for rating or flagging the strongest shots. Look for images that stand out due to composition, lighting, or a captivating moment (like a lion roaring or elephants interacting). This helps you narrow down your portfolio to the most impactful images.
9.4 Printing and Sharing
In an age where most pictures stay on a digital screen, consider printing a few of your favorite safari photos. Physical prints or photobooks are a great way to share your experiences with friends and family. You can also post your best shots on social media, travel blogs, or photography forums. Sometimes, getting feedback from a community can help you improve further.
10. Safari Logistics for Photographers
10.1 Vehicle Considerations
Many safari vehicles have open sides or pop-up roofs that allow for unobstructed views. If possible, arrange for a vehicle with enough room so that everyone can move around and find the best shooting angles. A private safari might be ideal for serious photographers who do not want to disturb or be disturbed by others’ schedules or vantage points.
10.2 Field Etiquette
When on a shared vehicle, be mindful of fellow travelers. If you see a rare bird or an interesting angle, politely let others know so they can also take photographs. Conversely, try to avoid hogging the best window space if everyone wants a turn. Communicating with your driver-guide is also crucial—tell them about your photography goals, so they can position the vehicle in the best possible way and give you enough time to compose your shots.
10.3 Weather Challenges
Tanzania’s weather can be unpredictable, especially during the transitional months around the wet season. Keep a rain cover or plastic bag handy to protect your gear in the event of sudden rainfall. Dust can also be an issue, so changing lenses frequently in dusty conditions is best avoided. If you must change lenses, do it inside the vehicle with minimal exposure to the elements.
10.4 Power and Charging
Some lodges and camps have limited electricity, often running on generators or solar power. Take advantage of charging opportunities whenever possible. Carry extra batteries, and if you have camera models that use proprietary batteries, be sure to bring more than one charger in case of damage or loss.
11. Practical Tips for Success
11.1 Patience and Perseverance
Wildlife does not operate on our schedules. You may wait a long time for an animal to emerge from the bush or for the right light at sunset. Patience is key. If you are committed to capturing the perfect moment, be prepared for extended waits and learn to use that time to your advantage—scout the area, tweak your camera settings, or observe animal behavior patterns.
11.2 Knowing Animal Behavior
Even basic knowledge of animal behavior can help you anticipate key photographic moments—a lion’s characteristic yawn, a cheetah’s pre-pounce posture, or an elephant calf playing with its mother. For example, hippos often yawn after surfacing, giving you time to compose the shot if you understand the pattern.
11.3 Embrace Mistakes as Lessons
Not every shot will be perfect. Overexposed skies, out-of-focus animals, or missed moments are part of the learning curve. Rather than getting frustrated, review what went wrong and try again. Photography is an art, and continual improvement often comes from analyzing past attempts.
11.4 Balancing Photography and Enjoyment
It is easy to become so focused on capturing the perfect shot that you forget to enjoy the experience. Sometimes, put the camera down and just observe. Talk with guides and fellow travelers, soak in the scenery, and appreciate the atmosphere. This balance will make your trip more enjoyable and can even inform your photography by giving you a better sense of the environment.
12. Example Shooting Scenarios
12.1 Early Morning Lion Pride
Scenario: You spot a pride of lions with playful cubs shortly after sunrise in the Serengeti.
- Lighting: Warm, low-angle sunlight.
- Settings: Aperture priority at f/5.6 for shallow depth of field, ISO 400 to maintain sufficient shutter speed, and continuous autofocus.
- Composition: Focus on the cubs’ faces, leaving some space for where they move or look.
12.2 Midday Elephant Herd at the Waterhole
Scenario: A herd of elephants approaches a Tarangire waterhole under bright midday sun.
- Challenges: Harsh overhead light, possible shadow cast on animals.
- Settings: Use a narrower aperture (f/8) if you want more of the herd in focus, keep ISO as low as possible to maintain detail in bright conditions.
- Technique: Meter off the elephant’s hide to avoid overexposure on lighter areas. Look for interesting interactions like trunk-to-trunk contact or a calf nuzzling its mother.
12.3 Sunset Silhouette in Ngorongoro
Scenario: A lone acacia tree on the crater rim as the sun goes down, creating a silhouette.
- Settings: Manual mode can help. Underexpose slightly to turn the tree and foreground into a crisp silhouette.
- Technique: Position the sun behind or just to the side of the tree, and focus on the background sky. A tripod (if available) helps with precise framing.
12.4 Night Photography at Camp
Scenario: You want to capture the Milky Way or star-filled sky above your lodge.
- Gear: A camera capable of long exposures (30 seconds or more), a sturdy tripod, and a wide lens with a large aperture (f/2.8 or f/4).
- Settings: ISO 1600 or higher, 15–30 second exposure time, and manual focus set to infinity (double-check focus by zooming in on a bright star).
- Challenge: Light pollution from the lodge or a moonlit sky can limit star visibility, so pick a night with little to no moon and minimal artificial lights nearby.
13. Common Mistakes and How to Avoid Them
- Shooting Only in Automatic Mode: Automatic settings may not always get it right, especially when you have strong backlighting or a fast-moving subject. Learning semi-automatic or manual modes is crucial for better control.
- Forgetting to Check Settings: You might adjust your ISO to 3200 in a low-light scene and forget to reset it, leading to unnecessarily noisy images under bright sunlight. Make a habit of reviewing settings every time lighting or subject changes.
- Relying Too Much on Zoom: Standing at maximum focal length can cause camera shake or framing issues. Sometimes, zooming out can yield more contextually powerful shots.
- Ignoring Safety: Leaning too far out of the vehicle or pressuring guides to get too close to animals can be dangerous. Always follow safety guidelines.
- Only Taking One or Two Shots: When you do encounter an exciting scene, take multiple shots. Changing angles, orientation (horizontal/vertical), and compositions can give you a variety of results.
14. Final Thoughts: Making the Most of Your Safari Photography
A photography-focused safari in Tanzania is about much more than collecting images. It is about the thrill of observing lions quietly stalk prey, the awe of seeing a massive elephant just a few meters away, the serene beauty of an African sunset, and the humility you feel when you realize you are a guest in this wild realm. While technical skills and gear do matter, your perspective, patience, and respect for nature will ultimately shape the quality of your images and your overall experience.
Learning photography is an ongoing journey—no single article can cover every detail or scenario you might encounter on safari. However, the insights shared here will help you start strong: planning your gear carefully, understanding camera settings, composing shots effectively, and acting responsibly toward wildlife and local cultures.
As you refine your techniques, stay open to advice from guides, fellow travelers, and local communities. Sometimes, the best photography tip is to slow down, watch the unfolding drama of the natural world, and let your creativity guide you. When you finally capture that perfect shot—whether it is a leopard’s intense gaze, a dramatic wildebeest crossing, or a vibrant Maasai gathering—you will appreciate the patience and dedication that made it possible.
Safari photography is an art of observation, timing, and connection. Embrace it wholeheartedly, and you will bring home not only stunning pictures but also unforgettable memories that reflect the heart and soul of Tanzania’s magnificent wilderness.